- How Do We Define Landscape Photography
- Choosing The Right Camera For Shooting Landscape Photography
- What To Look For When Venturing Outdoors For Landscape Photos
- Landscape Photography Tips And Techniques I've Learned
- Always Have Your Camera Gear With You At All Times
- For Better Control Plan Your Landscape Photo Shoot
- Don't Forget Your Tripod When Shooting Landscape Photographs
- Carry A Diary Or Notepad With You Always
- Choosing The Right Lens For Shooting Landscape Photography
- What Accessories Should You Use As Landscape Photographers
- L-Plate
- Composition In Landscape Photography
- How To Use The Rule Of Thirds In Landscape Photography
- The Golden Rule Of Landscape Photography
- Using The Golden Ratio In Landscape Photography
- The 3 Primary Exposure Camera Settings For Landscape Photography
- Where To Place The Horizon Line In Landscape Photography
- Use Sun Stars For Stunning Landscape Photos
- Use Leading Lines In Landscape Photography
- Post Processing Your Landscape Photography Tips
- Summary Of Best Techniques When Shooting Landscape Photography
- A Simple Exercise For Beginners To Learn Landscape Photography
- Questions
The best techniques when shooting landscape photography help define your work. Have you ever wondered why landscape photographs are so amazing? What is it about landscape photos that keeps your eyes glued to them? In short, it’s the tools you’ll learn in this article. Keep reading to learn the best techniques for shooting landscape photography.
How Do We Define Landscape Photography
Landscape photography is capturing Mother Nature’s glorious creations . These creations exist everywhere on the planet and consist of a wide variety of elements. Elements that evoke feelings and define the landscape trigger our senses into action. Our goal is to express our emotions which overwhelmed us when we capture the shot. If done right, the viewer will feel like he or she is actually there admiring the scene with you.
We achieve this by practicing the techniques learned with every photo shoot. By reading articles like this or other forms of media we train our mind to act instinctively. Repetition is key to becoming a better landscape photographer. In this article you learn some of the techniques I’ve learned over the years. Practice them and become a better landscape photographer.
Choosing The Right Camera For Shooting Landscape Photography
Choosing the right camera for shooting landscape photography will depend on your objectives. I recommend finding a full frame DSLR or Mirrorless camera. But a good crop sensor one will suffice also. Both DSLR and Mirrorless cameras offer full frame sensors. A DSLR has a longer battery life than a Mirrorless one. Full frame cameras need full frame lenses so cost is a factor to consider. Weight is another thing to think about if you hike a lot.
Portability is another feature you should consider when shooting landscapes. Don’t forget to consider weather sealing for those misty damp days.
Your budget will determine which camera meets your landscape photography goals. Look for cameras which provide high resolution and good dynamic range. Find a digital camera with manual exposure controls. This allows you to adjust shutter speeds, aperture and ISO settings for more control.
If your focus is on landscape photos only, than autofocus and speed are less important. But if you want a camera for shooting wildlife also, than find a happy medium one.
What To Look For When Venturing Outdoors For Landscape Photos
Landscapes include: astrophotography, cityscapes, forests, lakes, mountains, rivers, seascapes, sunrises and sunsets. Always look for landscape photography opportunities in your travels. Never leave home under any circumstance without your camera gear. I took some amazing photographs while I was driving to town to buy groceries.
Sometimes it only takes a minute to capture the shot of a lifetime. Other times sacrificing your commitment for a great shot is worth it. In any case, without your photography gear the opportunities won’t exist.
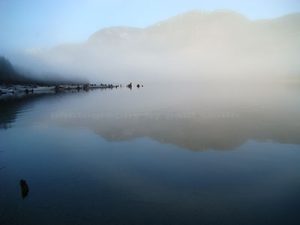
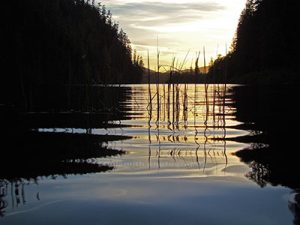
I am fortunate to live in Nootka Sound on Vancouver Island where landscape photos abound. One morning I was driving to Campbell River (1 hour) to do some shopping. Along the way I noticed fog settled over Upper Campbell Lake. I pulled over at a rest area beside the highway and walked to the beach.
There I set up my tripod and Sony DSC-H9 and captured the photo above. I used a Sony wide angle conversion lens add on to the fixed lens. It uses the lens hood as a bellows to attach over the fixed lens. I shot this photo using a focal length of 5.2 mm along with an exposure of 1/60 sec; f/8; ISO 100.
The fog that covered the calm water lake evoked a peaceful, serene feeling. That was a special morning and I didn’t get back from shopping until late in the evening. Well worth the sacrifice as three of my photographs including this one sold to clients.
I shoot a lot of my landscape photography while traveling to no place in particular. No matter where you live in this world you’ll find ample stunning landscape photos near you. Getting out there is the first step towards capturing great landscape photographs.
Landscape Photography Tips And Techniques I’ve Learned
Always Have Your Camera Gear With You At All Times
One thing I learned over the years is to always have my camera gear with me at all times. Even if it is only a point and shoot type of camera. I missed so many great landscape photos because I forgot to take my equipment. Even doing my day job I always have a camera with me for those special times which present themselves.
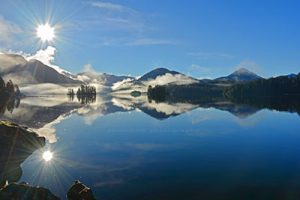
One day while doing a road patrol for work, I came upon an amazing landscape photo opportunity.
The morning sun was rising over a mountain and shining across an ocean inlet. The fog was still present further out in the inlet.
This landscape shot I took with my Nikon D7100. I used a polarizing filter over the 18.0-140.0 mm f/3.5-5.6 Nikkor lens and 1/125 sec, f/11, ISO 100 exposure settings.
Now a days your smart phone can substitute as your point and shoot camera. It amazes me how well these devices capture images and videos. Yet, they don’t replace the quality of a 35mm or DSLR camera. In a limited capacity you may sell a few photographs for the web but enlargements, not so much.
(Affiliate Link)
For Better Control Plan Your Landscape Photo Shoot
If you want more control over shooting landscape photography, plan your day. In other words, take the time to create a situation where you control most of the outcome. Choose a location that provides great landscape photo opportunities. Can you drive right to it, or do you have to hike in?
Determine the time required to travel to your destination. Factor in sunrise and sunset times to take advantage of the warmer light. After that, check the weather in the area to determine the type of light present during the day.
Decide what to bring for camera equipment if the weather report is accurate. Likewise, bring alternatives in case the weather changes or is inaccurate. I have taken awesome sunrise photos in the morning. And after that, captured a moody, foggy afternoon photo in the same area.
Don’t let the weather control your photo shoot. Use what Mother Nature throws at you by preparing for changes. But, you don’t need a heavy backpack to achieve your objectives. If you have to hike in only pack what you need.
Don’t Forget Your Tripod When Shooting Landscape Photographs
Because you want to capture high quality landscape images never forget your tripod. A tripod always provides better quality landscape images than any image stabilization feature.
For example, when shooting silky water scenes using a slow shutter speed, you need a tripod. This image of the small creek wouldn’t have been possible without a tripod.
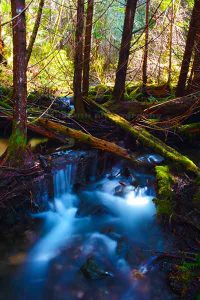
I used my Nikon D7100 with a Nikkor 18-140mm lens and a wide angle lens focal length of 18mm (in 35mm: 27.0 mm). The shutter speed setting was 13.0 sec, aperture at f/22 and ISO 100.
Without a tripod in low light conditions you would need to increase your ISO range. This would result in more image noise in your photograph. Thus, you restrict your photo to smaller enlargement sizes. And your landscape photos commercial value may diminish.
Last but not least, you don’t want to cheap out on your tripod. Look for a tripod that is strong and stable enough to support your camera and lens in windy conditions. You may have to compromise a little to ease the weight burden when hiking.
Carry A Diary Or Notepad With You Always
A photography tip I learned from my 35mm film format days is always carry a diary/notepad with me. It allows you to keep track of important information. Things like weather, exposure details, light conditions and terrain. All these things help you to remember the experience and learn what worked and what didn’t.
Digital cameras today record aperture, ISO, shutter speed, focal length and lens size. They record other details like aperture priority, shutter priority and sensor types too. Recording the filter used, lighting source, terrain or weather conditions is up to you.
By keeping records of each landscape photography shot, your skill level increases. Next time you find yourself in a similar situation the previous notes will prepare you for a better shot. Or if you want to experiment with different camera settings you have a baseline to draw from.
I found myself wanting to return to a special spot one year to photograph a waterfall. Turning to my photography diary I learned that spring provided better water levels. I determined that late morning provided the best light when the sun rose above the mountain.
After hiking for an hour I found this spot that I recorded in my diary the previous year.
Because of the low light conditions in the forest, I used my Sony DSC-H9 with my wide angle lens.
The exposure was: shutter speed 2.0 sec, aperture f/8 and ISO 100.
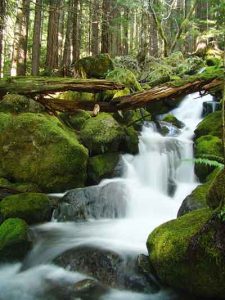
There were other details that helped me get stunning landscape photos that day. Without my previous knowledge written in my diary I may never have used a neutral density filter. A number 4 neutral density filter darkened the harsh backlit tree line. It also added extra silkiness to the flowing water.
Choosing The Right Lens For Shooting Landscape Photography
Wide Angle Lens
My preference is using a wide angle lens when shooting landscape photography. You define a wide angle lens as 50mm or less. I lean towards wider panoramic views in landscapes. This makes me focus on the foreground elements. Which sometimes turns a great image into a stunning photo.
In this image I shot the beginning of the sunset and the reeds in the foreground of the lake. I set my tripod low to the water and used the reeds to provide some depth. I used a shutter speed of 1/250 sec to freeze the water movement. An f-stop of 4 darkened the trees on both sides of the lake.
The darkened trees provided a framing technique to the landscape photo. This directed the viewers attention to the reeds highlighted by the sunset. The wide angle lens captured more of the shoreline than a telephoto lens could.
Telephoto Lens
Not all landscape photographers use wide angle lenses only. Nor should they. Using a telephoto or zoom lens captures images that wide angle lenses couldn’t. A telephoto lens allows you to zoom in on a subject and maintain some of the landscape behind it.
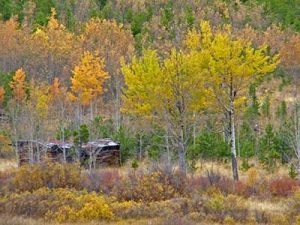
I spotted this trappers cabin in the Caribou Region of British Columbia, Canada. I set up a tripod using my Nikon D7100 and Nikkor 18-140mm lens at 117mm. The shutter setting was 1/125 sec. to mitigate the light breeze. I set the aperture at f/8 to capture enough detail without loosing vibrant colors of the trees.
I only took one shot as I was making a freight delivery for work. Would have liked to try a smaller aperture (f/11 or f/16) to capture more depth of field. Time was not my friend so I didn’t get the chance to experiment. Then there was the wind to think about.
Don’t limit yourself to one lens, experiment with different lenses. Sometimes a longer lens produces a stunning landscape image too. Doing so will make you a better landscape photographer.
An enlargement of this image hangs on the wall of a popular family restaurant in the Comox Valley, Canada. So on top of my hourly wage I made money selling this photograph.
What Accessories Should You Use As Landscape Photographers
Choosing the right accessories for your camera and photography in general is important. With every genre in photography many different accessories are available. I’ll start with the ones important enough to me for landscape photographers. Remember, your priorities and needs may be different so choose what works for you.
Batteries And Memory Cards
I learned early on to carry spare batteries and memory cards for all my cameras. A few times I’ve had batteries die or memory cards fill up and lots of photo opportunities remained.
There are wallets and cases available to store your batteries and memory cards if you have more than one. I have a case that holds 2 batteries and 4 memory cards.
Most camera batteries today are lithium-ion. They’re rechargeable and hold their charge longer than the nickel-cadmium style. Like any battery lithium-ion batteries have a limited life.
This depends on how many times you recharge the battery. So recharge it only when needed. Sometimes my batteries remain uncharged for weeks before I recharge them.
If you have more than one memory card get into the habit of labeling them. This way you know which memory cards are full or empty based on the label. I use the colored stick on dots with red for full and white for empty. I swap and replace them as needed.
Most professional landscape photographers understand memory cards need occasional maintenance. But few amateur photographers know this.
Formatting the memory card not only deletes the images but creates a new directory. This helps mitigate problems like when your computer has issues reading the card.
I like to format my memory cards after I upload all my pictures to my storage drive. Choose what works best for you as long as you do it on a regular basis.
Camera Bag
When choosing the right camera bag look for the functionality you need. I have a few bags chosen for different scenarios I may come across. The bags I use range from a travel bag to a backpack depending on my task for the shoot. If you’re flying to a travel destination than you may need more than one bag for your gear.
Landscape photography usually requires a stronger backpack style of camera bag. Most of the time you’re hiking into your photo shoot. But if you’re driving to the chosen location a simple travel bag and/or hard case is ideal. When trying to decide on which camera bag to buy keep the following tips in mind.
Filters
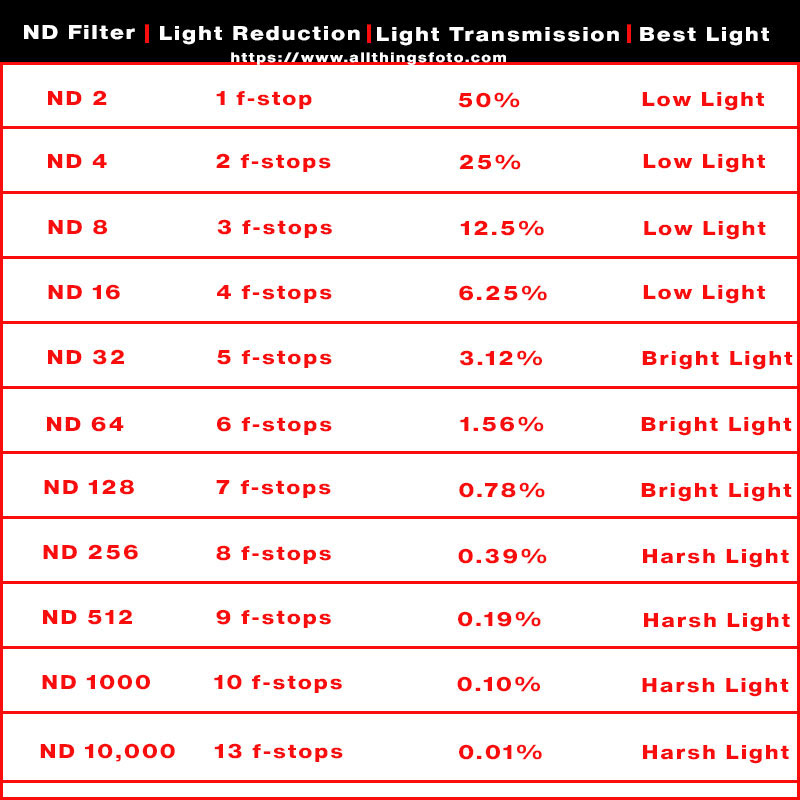
I never go anywhere without my filter kits. My favorites are: Neutral Density (ND) Filters, Polarizing Filters and Graduated ND Filters. I use these three more than any others for great landscape photos.
A great photography tip is to not cheap out when buying polarizing filters. The same holds true for all filters you buy. Cheap polarizing filters leave a noticeable vignette at the edges of your image. Darker corners are another example of low quality polarizing filters.
Polarized (PL) filters block the glare on water and deepen colors like the sky. They provide the greatest strength when positioned 90 degrees to the sun or light source. PL filters block up to 2 stops of light. And they don’t work well with most lens hoods.
ND filters reduce the amount of light hitting the sensor. The decrease in light intensity is even throughout all wavelengths. A ND filter works best during the daytime when you need a longer shutter speed. ND filters come in sizes from ND2 to ND10,000. The numbers signify the amount of light it blocks.
Graduated ND filters allow variable light transmission in an exposure. They do so in a graduated way from top to bottom. The darker the gradient the less light hits the sensor in that section of the filter.
Lens Cleaning Kit
Never leave home without your lens cleaning kit. This is the most used accessory in your camera bag when shooting landscapes. It is crucial to keep your lenses clean for the best landscape shots.
L-Plate
Also known as an L-Bracket this accessory keeps the center of gravity at the top of your tripod. The L-Plate accessory switches your camera from horizontal to vertical. You never worry about re-adjusting the composition or the tripod falling over.
The L-Plate attaches to a quick release plate attached to your tripod. This saves time, subject composition remains and it maintains stability of the tripod.
Quick Release Plate
A quick release plate allows you to change camera bodies with ease. No more unscrewing the tripod bolt from your camera’s body. I leave one attached to my cameras and tripods at all times.
Remote And Shutter Release Cable

Most cameras come with a remote and or self timer today. This allows you to control your camera shake when the shutter releases. The majority of DSLRs and Mirrorless cameras also have an input for a cable release.
Older models need a shutter release cable to achieve the same thing. For example, my 35mm Olympus OM1 has threads built into the shutter button.
(Affiliate Link)
Composition In Landscape Photography
Composition determines a great landscape image from a bad one. It is one of the elements of photography that post processing cannot fix. Sometimes cropping helps but at a loss of image resolution and print quality.
The following landscape photography tips for composition are some I use a lot. Use them as much as possible and experiment with different combinations of them. They will become second nature over time when looking at composition.
Remember photography like all forms of art is subjective. This means your viewers form their own opinions and expressions. Your goal is to help them see and feel yours. Once you master these composition for landscape photography tips you’re on your way.
How To Use The Rule Of Thirds In Landscape Photography
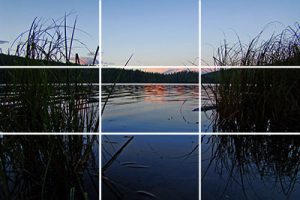
The rule of thirds in photography controls the placement of your subjects in the image. Think of a tic-tac-toe grid overlaid on your image. Your image now consists of three horizontal rows and three vertical rows. All together there are 9 frames of equal size in the image.
Use this imaginary visual grid to place your subject off center in one of the frames or rows. By doing so, you create balance and move your viewers eye in a pleasant way through the composition.
The image above places the sunset close to the top horizontal grid line. Place sunset or sunrise horizon lines on or near the top or bottom grid lines. I used the left and right vertical rows to place the reeds in the lake.
When positioning your key elements within the grid lines your composition becomes better. The image becomes more balanced and dynamic providing an engaging photographic experience.
The Golden Rule Of Landscape Photography
Professional landscape photographers follow the golden rule of landscape photography. Also known as the Golden Hour. The rule states that you capture all landscape photography pictures at dawn and dusk. This takes advantage of the warmer light and soft shadows that occur only at these times.
Generally, you define dawn as 15-30 minutes before sunrise and 30-60 minutes afterwards. Meanwhile, dusk is 15-30 minutes before sunset and 30 minutes after. Unless you’re a professional photographer for National Geographic, don’t worry about them much. I shoot stunning landscape photos outside these times a lot.

This landscape photograph of a sunset over Campbell Lake on Vancouver Island I shot at 7:23pm.
Official sunset time was 6:33pm. I starting shooting images at 7:10pm because I liked the highlight of the sun on the clouds.
The shadows weren’t soft like they were earlier but the colors of the sky is what I was after. Reflection in the water was an added bonus. The camera settings were 1/125 sec, f/5.6, ISO 100 at 18.0 mm (in 35mm: 27.0 mm).
Using The Golden Ratio In Landscape Photography
The Golden Ratio is a mathematical ratio (1.618:1) and is very common in nature. When used to compose your image it evokes beauty, harmony and proportion to your viewers eye.
For thousands of centuries artists, designers and photographers applied the Golden Ratio. Works of art like the Mona Lisa, the Pyramids of Egypt and popular logos like Pepsi use the Golden Ratio.
The Golden Spiral or Fibonacci Spiral is a refined version of the Golden Ratio. The Golden Spiral exists in many elements of nature. Elements like flowers, shells, trees, waves and weather patterns exhibit the Golden Spiral.
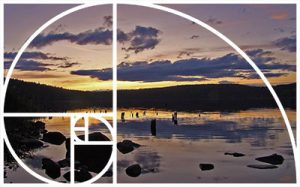
When shooting landscape photography try to incorporate the Golden Spiral into your image. Envision a spiral with your subject placed in the beginning of it. The rest of the elements flow outward from your subject in a pleasing manner.
Remember the Golden Spiral works from all angles. You can flip it horizontal or vertical depending on where you place your subject. When first composing your image pay attention to other elements besides your subject. Do you want to include any of them into the composition. If so, use the Golden Spiral technique to bring them into the landscape photograph.
The 3 Primary Exposure Camera Settings For Landscape Photography
Before every stunning landscape photograph comes to life, you need a proper exposure. This means combining apertures, shutter speeds and ISO/ASA balanced together. To do this you need to understand how each setting affects the other.
The relationship between all three depends on the amount of light available. In low light situations wider apertures and slower shutter speeds capture more light. Higher ISO settings allow the sensor to make a correct exposure with less light. Good light conditions allow more flexibility with narrower apertures and a faster shutter. Lower ISO settings allow the sensor to make a correct exposure when their is more light.
If you’re a beginner you need to understand how to balance all three for a proper exposure. The image below shows the relationship between a 1 stop movement and exposure. Each individual exposure has its own explanations and doesn’t correlate to the other.
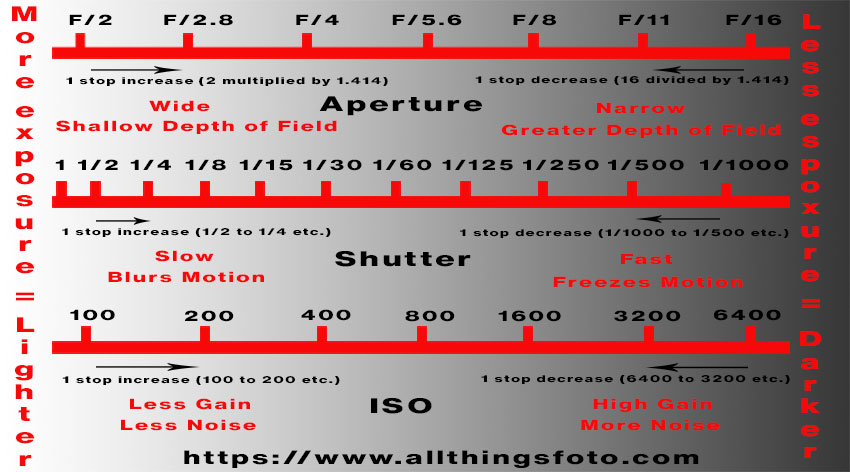
This means you shouldn’t use the image for anything other than a simple guideline. You can use it to help you understand what 1 stop up or down represents for the individual setting.
Try shooting in manual mode only to begin with. Choose your aperture, shutter and ISO settings based on your impression. Then try the same composition in aperture priority mode. This will show you how your landscape exposure looks for better clarity between the two.
Experiment with different settings to see how many combinations give you great results. Landscape photographers refer to this as bracketing your exposures.
Where To Place The Horizon Line In Landscape Photography
Landscape photographers understand where they place the horizon line completes a beautiful landscape. Using the rule of thirds, the horizon must be above or below the center of the image.
I am a firm believer in breaking the rules of photography when needed. Many times I place my horizon in the center of my image. A mountain landscape image with a stunning reflection for example works in this case.
Most of the time you need to ensure the horizon is level and not higher or lower on one end. This is crucial when shooting seascapes or water images. Experiment with different positions until you feel comfortable with your landscape pictures.
Use Sun Stars For Stunning Landscape Photos
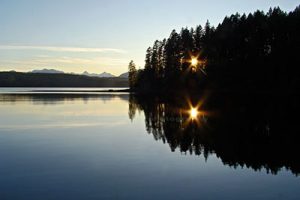
Sun stars create a magical element to your landscape images. When combined with their reflection in water your images become stunning landscape photos. If you are able to capture them during the golden hour even better. A polarizing filter helps to define the sun star rays.
Using my Sony DSC-H9, I shot the image above. I set my exposure settings to I set my exposure settings to f/8, 1/160 and 100 ISO. When you use a polarizing filter the sun rays become amplified.
I set up my tripod and starting shooting images 1½ hours before sunset. I captured this image 44 minutes before sunset, 14 minutes before the golden hour.
Use Leading Lines In Landscape Photography
If you want to turn a good landscape image into a stunning landscape image, use leading lines. These compositional elements lead the viewers eye in a natural flow around the image. Usually the flow ends at the main subject in the image.
These elements can include bridges, creeks, mountains, roads, shorelines, trails and many more. So learn to look for anything that leads the viewers eye towards your subject.
Post Processing Your Landscape Photography Tips
Post processing your images is something which photographers have used from the beginning. Terms like burning and dodging are familiar from the medium, large and 35mm format days.
Back then the dark room was the place for dodging and burning. Today’s digital photography post processing techniques use software to do this and more.
Programs like Adobe Lightroom and Photoshop provide tools to improve your landscape photography. You can improve highlights and shadows on over or under exposed images. Cropping unwanted elements from your photograph is another example.
In the flower image above I used the shadows/highlights tool from Photoshop to help an over exposed image. A very poor quality photo to begin with but an example of what post processing can do.
Shooting Landscape Photography In Raw Format
If your camera allows it try to shoot in raw format for better control during the post processing steps. Yes the image raw files are larger but the data retained is critical for post processing.
Keep in mind you still need to focus on your original exposure and don’t get lazy because you can fix it in Photoshop. A very bad exposed photo still won’t become a great one no matter how much work you do with Photoshop.
Your raw files provide flexibility to fix mistakes especially in low light photos. There are many tools in photo editors to improve photographs.
Raw files contain a large amount of information which allows you to make major changes later on. Changes like fixing over exposed highlights and adding back details in shadows. You can make these changes without loosing quality.
I shoot landscape photography in both jpg and raw depending on what I am trying to capture. Sometimes it is for the web or sharing and other times to show some creativity with photo editing later on.
I’ve sold most of my work in jpg format but my raw format sales is increasing. Most digital cameras allow you to shoot landscape photography in both jpg and raw at the same time.
Summary Of Best Techniques When Shooting Landscape Photography
If you have read this far, you might feel a little overwhelmed which is normal for beginners. My advice is to take each landscape photography technique one a time and practice it. You will improve with each shot you take and it will become instinctual for you. Other rules I forgot to mention earlier are: rule of odds, sunny 16 rule and “f/8 and be there” rule. Follow the links to learn more.
Never stop Never stop learning and never stop trying new things. You don’t always have to follow the rules. Break them once in awhile to see some stunning photography.
I hope this article shows you landscape photography is one of the best ways to learn photography. Check out the simple exercise below to help you become a better photographer.
A Simple Exercise For Beginners To Learn Landscape Photography
Find A Landscape Scene That Speaks To You
I used to teach beginners to look for landscape scenes that evoke a sense of awe within them. It could be a cityscape, countryside, forest, lake, mountain, oceanscape or river scene. The types of landscape opportunities are everywhere.
Then plan a day trip to the same place and spend all day taking pictures using various compositions. Start at dawn and shoot until sunset or beyond.
Or if you have time constraints than plan whatever time suits you. I would suggest a couple of hours near the Golden Hour if possible. This way you will learn about the most important light of the day.
Take along a friend or friends to compare styles and notes together. No two photographers will see the same end result. But they help each other learn with different perspectives.
It amazes me when two students get different quality results from the same scene. Competition is a great teacher when used the right way.
Organizing Your Day So You Can Focus On The Task At Hand
Take the time to organize all your needs for the day. Things like food, water, clothing and transportation come to mind. Other necessities like spare batteries, memory cards, tripods, extra lenses etc. need packing.
Your list will depend on the duration of your day. If you only plan to spend part of the day instead of the whole day, plan for it. Don’t forget to check the weather in case you need rain gear and an umbrella.
Use All The Tools In Your Toolbox
Try a different sized lens and different aperture, shutter, ISO setting combinations. Use different filters to learn what effect they have on your exposure. Bracket your shots and keep detailed notes of everything.
Shoot a handheld shot and then a shot with the tripod. Look at the difference in image quality to understand camera shake. Use your remote or shutter release cable and notice the difference. Enlarging the image afterwards will show a better example of the differences.
Experiment With Depth Of Field
Change your aperture settings to see how they affect the depth of field in your image. Learn which settings provide detail or lack thereof. Using aperture priority will help you learn your camera’s abilities. But manual mode will teach you more about exposure settings.
Change Your Perspective To Learn About Light
Pay attention to the light and how it affects the foreground and background of your scene. Create a sense of scale by including a foreground element to your composition. Take another shot without the foreground element to see the difference. Experiment with different angles and perspectives to see how the light differs.
Where do the shadows fall within your composition and do they help it or distract it? What about the highlights? How do they benefit or hinder your final goal.
When It’s All Said And Done
After you complete the exercise spend a few days going over your results. Read through your notes and compare them to your images. Look at the images that stand out and try to determine why or what makes them so stunning. Present them to friends and family for their impressions to further your skill set.
Take the photos that lack detail or exposure and post process them. This helps you understand where you might have tried a different exposure setting. Take notes during this process also for future experiments.
Most of all have fun and remember only failure breeds success. So don’t look down on yourself if it takes longer than you thought. Keep practicing and learning from everything you do and you will improve eventually.